|
|
The major information compiled from an analysis of this sequence is:
First Person
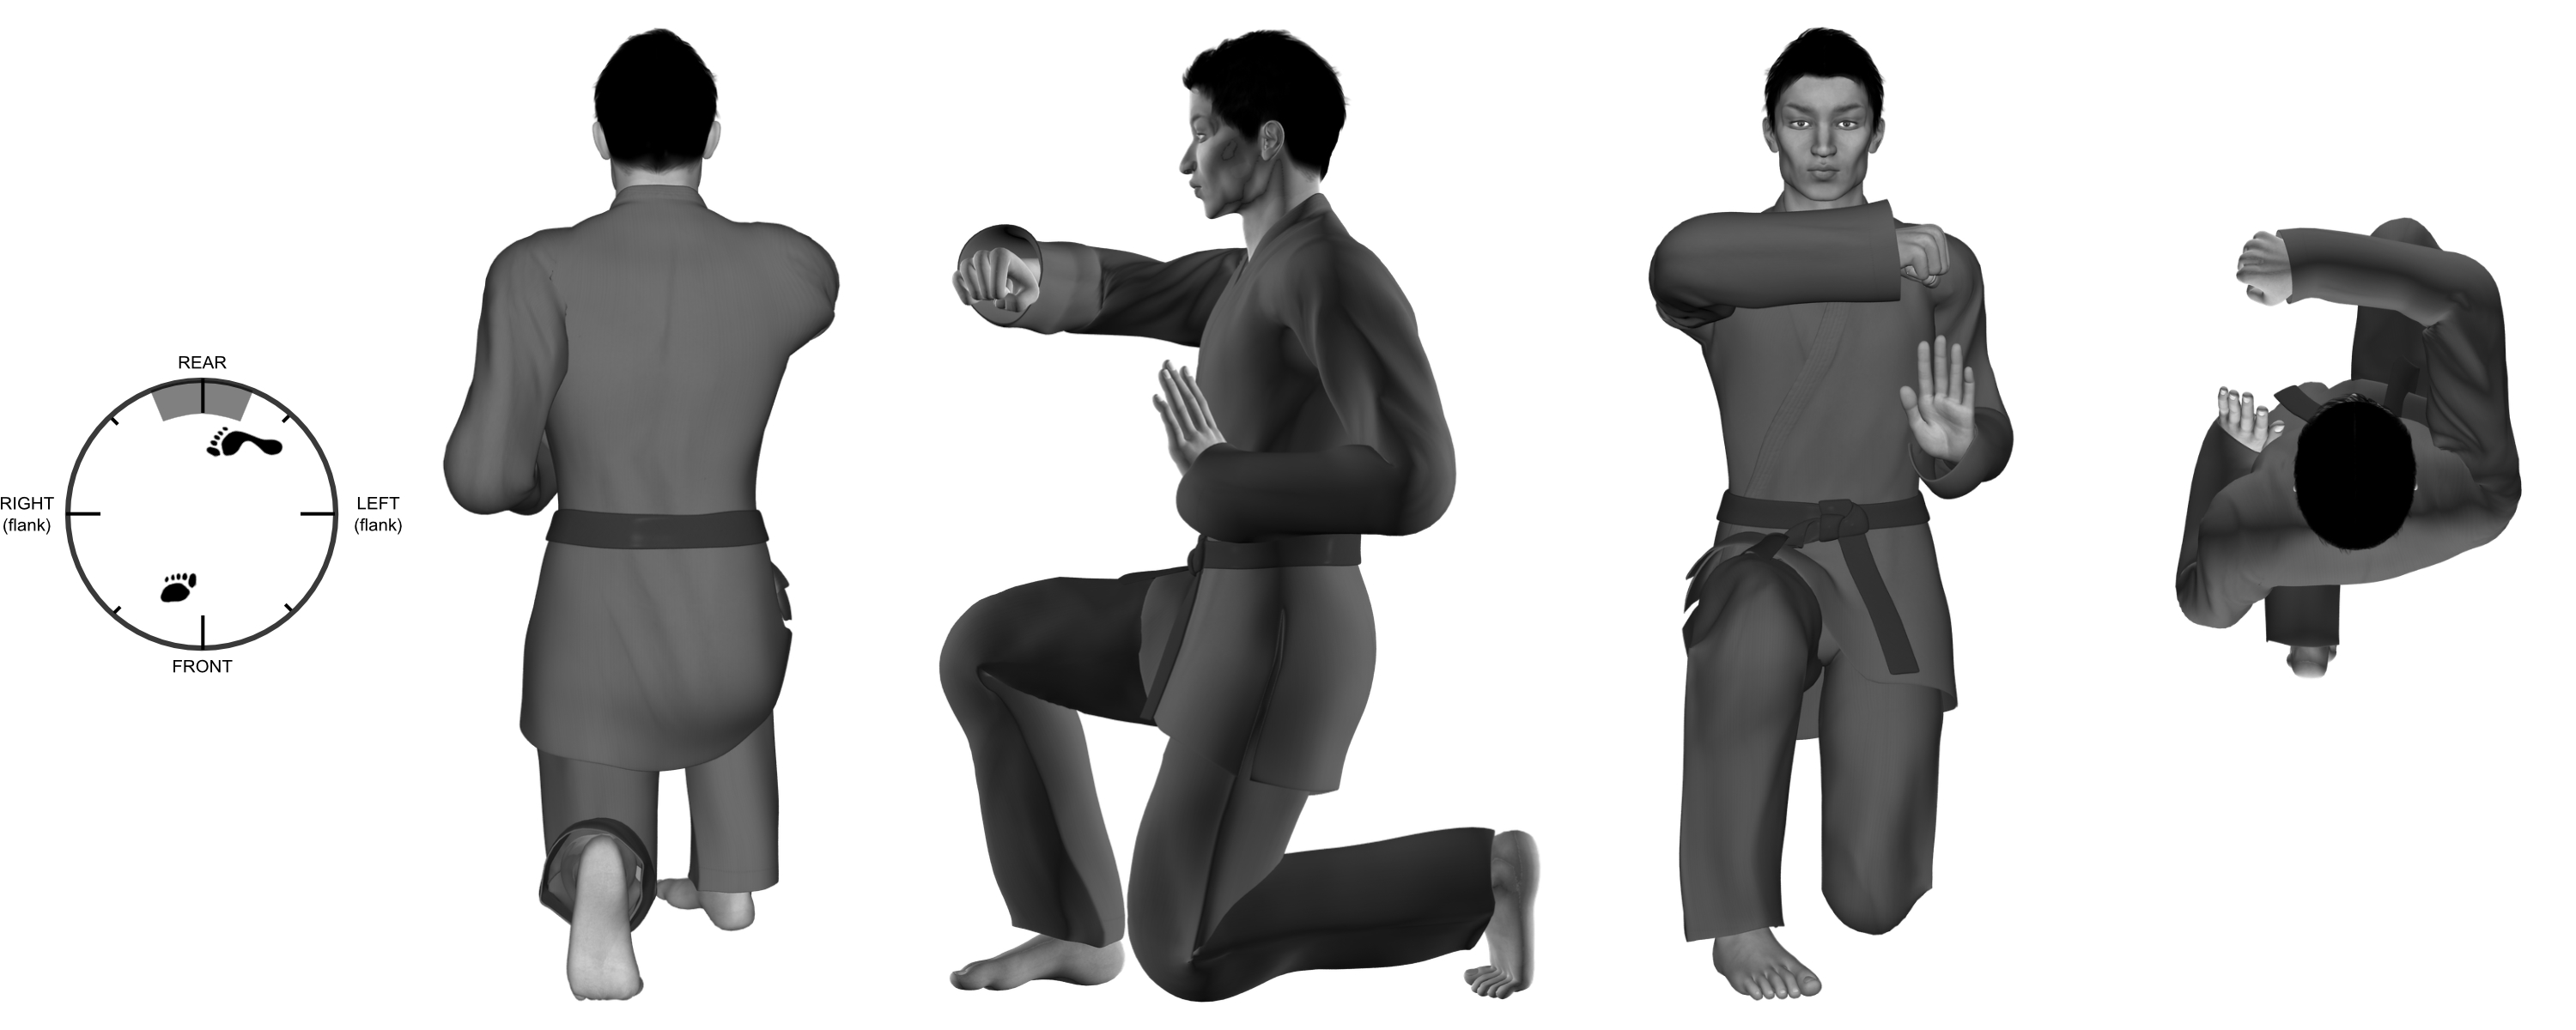
•Point of Reference (fixed): rear (6:00)
•Focal Point (fluid - primary): front (12;00)
•it demonstrates no shift (fixed / fluid) of Focal Point
•it demonstrates a shift in stance (height) without a shift in Focal Point
•it demonstrates both sides of a self-defense technique
•it introduces starting a technique from a kneeling position
•it demonstrates redirecting an in-flight aggression (with a single limb)
•it demonstrates offense with singular weapons (closed-open weapons)
•it demonstrates blocking and striking with both upper limbs
•it demonstrates a Vise-like maneuver with limbs
•it demonstrates Purposeful Deflection followed by Purposeful Aggression
•it demonstrates a foot maneuver using rotation without distance (then distance without rotation)
Major Principles / Theories / Concepts:
Alignment
Anchoring (Block)
Angle of Deflection
Angle of Incidence
Circle
Defensive Defense
Directional Harmony
Economy of Motion
Margin for Error
Offensive Offense
Outer Rim
Point of Origin
Power (Torque)
Purposeful Aggression
Purposeful Deflection
Strike
Vise-like
Major Physical Reverses / Opposites / Categories:
Protecting Fans |
▪Refer to Protecting Fans / Bowing to Buddha analysis |
Isolation Sequence #1 |
▪Refer to Isolation Sequence #1 / Bowing to Buddha analysis |
Darting Leaves |
▪Refer to Darting Leaves / Bowing to Buddha analysis |
Unfurling Crane |
▪Refer to Unfurling Crane / Bowing to Buddha analysis |
Destructive Kneel |
▪Refer to Destructive Kneel / Bowing to Buddha analysis |
Flashing Wings |
▪Refer to Flashing Wings / Bowing to Buddha analysis |
Gathering Clouds |
▪Refer to Gathering Clouds / Bowing to Buddha analysis |
Circles of Protection |
▪Refer to Circles of Protection / Bowing to Buddha analysis |
Dance of Darkness |
▪Refer to Dance of Darkness / Bowing to Buddha analysis |
Thundering Hammers |
▪Refer to Thundering Hammers / Bowing to Buddha analysis |
Unwinding Pendulum |
▪Refer to Unwinding Pendulum / Bowing to Buddha analysis |
Reversing Circles |
▪Refer to Reversing Circles / Bowing to Buddha analysis |
Snaking Talon |
▪Refer to Snaking Talon / Bowing to Buddha analysis |
Circling Fans |
▪Refer to Circling Fans / Bowing to Buddha analysis |
Isolation Sequence #2 |
▪Refer to Isolation Sequence #2 / Bowing to Buddha analysis |
Defensive Cross |
▪Refer to Defensive Cross / Bowing to Buddha analysis |
Bowing to Buddha |
▪Side: right / left ▪Maneuver - intent: defense / offense ▪Maneuver (offense) - degree of open: closed /.open ▪Step - elements: rotation / distance |
Prance of the Tiger |
▪Reference Point (initial) - direction: front / front flank ▪Maneuver (defense) - direction: inward (anchoring) / downward (push-down) ▪Maneuver (offense) - count: single / single-triple-double ▪Step (initial) - direction: downward (maintain) / backward ▪Step - elements: rotation (distance) / distance |
Shield and Mace |
▪Maneuver (defense) - direction: inward (anchoring) / outward ▪Step (initial) - direction: downward (maintain) / forward ▪Step - elements: rotation (distance) / distance+rotation |
Five Swords |
▪Maneuver (defense) - count: single / double ▪Maneuver (defense) - direction: inward (anchoring) / downward-inward (offset timing) ▪Step (initial) - direction: downward (maintain) / forward ▪Step - elements: rotation (distance) / distance+rotation |
Twirling Hammers |
▪Maneuver (defense) - direction: inward (anchoring) / extended outward ▪Maneuver (offense) - degree of open: closed-open / closed ▪Maneuver (offense) - method: pushing / pulling-pushing ▪Step (initial) - direction: downward (maintain) / sideways ▪Step - elements: rotation (distance) / distance (width) (distance+rotation) |
Major Conceptual Reverses / Opposites / Categories:
Protecting Fans |
▪Refer to Protecting Fans / Bowing to Buddha analysis |
Isolation Sequence #1 |
▪Refer to Isolation Sequence #1 / Bowing to Buddha analysis |
Darting Leaves |
▪Refer to Darting Leaves / Bowing to Buddha analysis |
Unfurling Crane |
▪Refer to Unfurling Crane / Bowing to Buddha analysis |
Destructive Kneel |
▪Refer to Destructive Kneel / Bowing to Buddha analysis |
Flashing Wings |
▪Refer to Flashing Wings / Bowing to Buddha analysis |
Gathering Clouds |
▪Refer to Gathering Clouds / Bowing to Buddha analysis |
Circles of Protection |
▪Refer to Circles of Protection / Bowing to Buddha analysis |
Dance of Darkness |
▪Refer to Dance of Darkness / Bowing to Buddha analysis |
Thundering Hammers |
▪Refer to Thundering Hammers / Bowing to Buddha analysis |
Unwinding Pendulum |
▪Refer to Unwinding Pendulum / Bowing to Buddha analysis |
Reversing Circles |
▪Refer to Reversing Circles / Bowing to Buddha analysis |
Snaking Talon |
▪Refer to Snaking Talon / Bowing to Buddha analysis |
Circling Fans |
▪Refer to Circling Fans / Bowing to Buddha analysis |
Isolation Sequence #2 |
▪Refer to Isolation Sequence #2 / Bowing to Buddha analysis |
Defensive Cross |
▪Refer to Defensive Cross / Bowing to Buddha analysis |
Bowing to Buddha |
▪Block / Strike ▪Defensive Defense / Offensive Offense ▪Directional Harmony / Vise-like Maneuver (Opposing Forces) ▪Gauging: Maintain Gap / Close Gap ▪Purposeful Deflection / Purposeful Aggression ▪Zone of Visibility / Zone of Obscurity |
Prance of the Tiger |
▪Gauging: Maintain Gap (Close Gap) / Open Gap ▪Purposeful Deflection - Purposeful Aggression / Purposeful Deflection + Purposeful Aggression ▪Push / Frictional Pull ▪Vise-like Maneuver / Opposing Forces ▪Zone of Obscurity / Zone of Visibility |
Shield and Mace |
▪Gauging: Maintain Gap (Close Gap) / Close Gap ▪Purposeful Deflection - Purposeful Aggression / Purposeful Deflection + Purposeful Aggression ▪Vise-like Maneuver (Opposing Forces) / Directional Harmony |
Five Swords |
▪Gauging: Maintain Gap (Close Gap) / Close Gap ▪Vise-like Maneuver (Opposing Forces) / Directional Harmony |
Twirling Hammers |
▪Gauging: Maintain Gap (Close Gap) / Close Gap ▪Push / Pull ▪Vise-like Maneuver (Opposing Forces) / Directional Harmony |
Second Person
•Point of Reference (initial): front (12:00)
•Point of Reference (fixed): front (12:00)
•Point of Reference (fluid): front (12:00)
•it demonstrates an elementary attack
•it demonstrates an attack from front (12:00)
•it demonstrates an in-flight major attack (kick)
•it demonstrates kicking
•it demonstrates a long range (major) attack
•it demonstrates aggression with a single weapon
•it demonstrates aggression (punch) on a linear path
•it demonstrates an attack from a single potential attacker
Major Principles / Theories / Concepts:
In-Flight Major Attack (single)
Kicking (offensive) (high zone)
Web of Knowledge - Kicks
Web of Knowledge - Grabs & Tackles (grab)
Major Physical Reverses / Opposites / Categories:
Protecting Fans |
▪Refer to Protecting Fans / Bowing to Buddha analysis |
Isolation Sequence #1 |
▪Refer to Isolation Sequence #1 / Bowing to Buddha analysis |
Darting Leaves |
▪Refer to Darting Leaves / Bowing to Buddha analysis |
Unfurling Crane |
▪Refer to Unfurling Crane / Bowing to Buddha analysis |
Destructive Kneel |
▪Refer to Destructive Kneel / Bowing to Buddha analysis |
Flashing Wings |
▪Refer to Flashing Wings / Bowing to Buddha analysis |
Gathering Clouds |
▪Refer to Gathering Clouds / Bowing to Buddha analysis |
Circles of Protection |
▪Refer to Circles of Protection / Bowing to Buddha analysis |
Dance of Darkness |
▪Refer to Dance of Darkness / Bowing to Buddha analysis |
Thundering Hammers |
▪Refer to Thundering Hammers / Bowing to Buddha analysis |
Unwinding Pendulum |
▪Refer to Unwinding Pendulum / Bowing to Buddha analysis |
Reversing Circles |
▪Refer to Reversing Circles / Bowing to Buddha analysis |
Snaking Talon |
▪Refer to Snaking Talon / Bowing to Buddha analysis |
Circling Fans |
▪Refer to Circling Fans / Bowing to Buddha analysis |
Isolation Sequence #2 |
▪Refer to Isolation Sequence #2 / Bowing to Buddha analysis |
Defensive Cross |
▪Refer to Defensive Cross / Bowing to Buddha analysis |
Bowing to Buddha |
|
Prance of the Tiger |
▪Attack - direction: front / front flank ▪Attack - height zone: low / high |
Shield and Mace |
▪Attack - height zone: low / high |
Five Swords |
▪Attack - height zone: low / low-high |
Twirling Hammers |
▪Attack - height zone: low / high |
Major Conceptual Reverses / Opposites / Categories:
Protecting Fans |
▪Refer to Protecting Fans / Bowing to Buddha analysis |
Isolation Sequence #1 |
▪Refer to Isolation Sequence #1 / Bowing to Buddha analysis |
Darting Leaves |
▪Refer to Darting Leaves / Bowing to Buddha analysis |
Unfurling Crane |
▪Refer to Unfurling Crane / Bowing to Buddha analysis |
Destructive Kneel |
▪Refer to Destructive Kneel / Bowing to Buddha analysis |
Flashing Wings |
▪Refer to Flashing Wings / Bowing to Buddha analysis |
Gathering Clouds |
▪Refer to Gathering Clouds / Bowing to Buddha analysis |
Circles of Protection |
▪Refer to Circles of Protection / Bowing to Buddha analysis |
Dance of Darkness |
▪Refer to Dance of Darkness / Bowing to Buddha analysis |
Thundering Hammers |
▪Refer to Thundering Hammers / Bowing to Buddha analysis |
Unwinding Pendulum |
▪Refer to Unwinding Pendulum / Bowing to Buddha analysis |
Reversing Circles |
▪Refer to Reversing Circles / Bowing to Buddha analysis |
Snaking Talon |
▪Refer to Snaking Talon / Bowing to Buddha analysis |
Circling Fans |
▪Refer to Circling Fans / Bowing to Buddha analysis |
Isolation Sequence #2 |
▪Refer to Isolation Sequence #2 / Bowing to Buddha analysis |
Defensive Cross |
▪Refer to Defensive Cross / Bowing to Buddha analysis |
Bowing to Buddha |
|
Prance of the Tiger |
▪Web of Knowledge: Kicks / Punches |
Shield and Mace |
▪Web of Knowledge: Kicks / Punches |
Five Swords |
▪Web of Knowledge: Kicks / Kicks - Punches |
Twirling Hammers |
▪Web of Knowledge: Kicks / Punches |
Third Person
Defense
•Point of Reference (form): front (12:00)
•Point of Reference (stance): front (12:00)
•Point of Reference (maneuver): front (12:00
•it demonstrates a circle reversed
•it demonstrates a Zone of Action inside the leg
•it demonstrates a defense against a single attack (in-flight majors)
•it demonstrates singular major offensive maneuvers
•it demonstrates 1-in-1 (defensive-offensive) / 2-in-1 (defensive) timings
•it demonstrates both sides of the sequence
•it demonstrates a degree of standing (kneeling)
•it demonstrates foot maneuvers from a (partial) kneeling position (step-drag / hop switch)
•it demonstrates a Vise-like maneuver
•it utilizes long range and short range weapons
•it utilizes open and closed weapons
•it utilizes the neutral bow and forward bow stance (kneeling)
•it utilizes only the top weapons of opposite sides
•it utilizes both ends of a weapon (arm)
•it demonstrates combining circular motions to form a 'figure 8'
•it demonstrates defensive intersecting circular motions (aka figure 8) with a single arm (block / strike)
•it demonstrates intersecting circular motions (aka figure 8) with a single arm traveling in opposite direction (inward / upward / downward)
•it demonstrates intersecting circular motions (aka figure 8) at different depths (offset in time)
•it demonstrates intersecting circular motions (aka figure 8) with vertical paths parallel and perpendicular to the body
Offense
•Point of Reference (global): rear (6:00)
•it demonstrates defense against a single elementary attack (kick)
Major Principles / Theories / Concepts:
Figure 8
Orbital Switch
Range (Attack) (Far)
Reverse Motion
Major Physical Reverses / Opposites / Categories:
Protecting Fans |
▪Refer to Protecting Fans / Bowing to Buddha |
Isolation Sequence #1 |
▪Refer to Isolation Sequence #1 / Bowing to Buddha |
Darting Leaves |
▪Refer to Darting Leaves / Bowing to Buddha |
Unfurling Crane |
▪Refer to Unfurling Crane / Bowing to Buddha |
Destructive Kneel |
▪Refer to Destructive Kneel / Bowing to Buddha |
Flashing Wings |
▪Refer to Flashing Wings / Bowing to Buddha |
Gathering Clouds |
▪Refer to Gathering Clouds / Bowing to Buddha |
Circles of Protection |
▪Refer to Circles of Protection / Bowing to Buddha |
Dance of Darkness |
▪Refer to Dance of Darkness / Bowing to Buddha |
Thundering Hammers |
▪Refer to Thundering Hammers / Bowing to Buddha |
Unwinding Pendulum |
▪Refer to Unwinding Pendulum / Bowing to Buddha |
Reversing Circles |
▪Refer to Reversing Circles / Bowing to Buddha |
Snaking Talon |
▪Refer to Snaking Talon / Bowing to Buddha |
Circling Fans |
▪Refer to Circling Fans / Bowing to Buddha |
Isolation Sequence #2 |
▪Refer to Isolation Sequence #2 / Bowing to Buddha |
Defensive Cross |
▪Refer to Defensive Cross / Bowing to Buddha |
Bowing to Buddha |
▪Defense - stance: standing / kneeling ▪Defense - foot maneuver: drop / switch (hop)
▪Defense - pattern - figure 8 (boundaries): inside outer rim / inside outer rim ▪Defense - pattern - figure 8 (dimensions [primary]): width(+height) / depth(+height) ▪Defense - pattern - figure 8 (direction): inward / upward / downward ▪Defense - pattern - figure 8 (height zones): high / high ▪Defense - pattern - figure 8 (intent): defensive / offense ▪Defense - pattern - figure 8 (orientation): vertical (parallel to front of body) / vertical (perpendicular to front of body) ▪Defense - pattern - figure 8 (weapon count): single (offset timing) |
Prance of the Tiger |
▪Attack - angle (from front): direct / offset ▪Attack - weapon height zone - usage: lower / upper ▪Defense - foot maneuver: in-place / backward ▪Defense - maneuver (count): single / triple (simultaneous) - double (simultaneous) ▪Defense - stance: kneeling / standing ▪Defense - weapon height zone - usage: upper / lower
▪Defense - pattern - figure 8 (boundaries): inside outer rim / outside outer rim ▪Defense - pattern - figure 8 (dimensions [primary]): width(+height)-depth(+height) / width(+height)-height(+width) ▪Defense - pattern - figure 8 (direction): inward-upward-downward / upward-inward ▪Defense - pattern - figure 8 (intent): defensive-offensive / offense-offensive ▪Defense - pattern - figure 8 (orientation): vertical (parallel to front of body)-vertical (perpendicular to body) / vertical (parallel to front of body[offset])-vertical (parallel to front of body) |
Shield and Mace |
▪Attack - weapon height zone - usage: lower / upper ▪Defense - foot maneuver: in-place / forward
▪Defense - pattern - figure 8 (dimensions [primary]): width(+height)-depth(+height) / height(+width)-height(+width) ▪Defense - pattern - figure 8 (direction): opposite (inward-upward-downward) / opposite (inward-inward) ▪Defense - pattern - figure 8 (intent): defensive-offensive / offensive-defensive ▪Defense - pattern - figure 8 (weapon count): single (offset timing) / double (simultaneous) ▪Defense - pattern - figure 8 (orientation): vertical (parallel to front of body)-vertical (perpendicular to body) / vertical (parallel to front of body[offset])-vertical (parallel to front of body) |
Five Swords |
▪Attack - count: single / double (offset) ▪Attack - weapon height zone - usage: lower / lower-upper ▪Defense - foot maneuver: in-place / forward ▪Defense - stance: kneeling / standing |
Twirling Hammers |
▪Defense - foot maneuver: in-place / crossover(sideways)-forward ▪Defense - stance: kneeling / standing
▪Defense - pattern - figure 8 (dimensions [primary]): width(+height)-depth(+height) / depth(+width)+depth(+width) ▪Defense - pattern - figure 8 (direction): opposite (inward-upward-downward) / same (inward+inward) ▪Defense - pattern - figure 8 (height zones): upper-upper / lower+upper ▪Defense - pattern - figure 8 (intent): defensive-offensive / positional+positional ▪Defense - pattern - figure 8 (orientation): vertical (parallel to front of body)-vertical (perpendicular to front of body) / horizontal (parallel to bottom of body)+horizontal (perpendicular to front of body) ▪Defense - pattern - figure 8 (weapon count): singe (offset timing) / double (simultaneous)
▪Defense - pattern - figure 8 (dimensions [primary]): width(+depth)-depth(+height) / depth(+height)-depth(+height) [spiral] ▪Defense - pattern - figure 8 (direction): opposite (inward-upward-downward) / same (backward-inward) ▪Defense - pattern - figure 8 (intent): defensive-offensive / offensive-offensive ▪Defense - pattern - figure 8 (orientation): vertical (parallel to front of body)-vertical (perpendicular to front of body) / horizontal ([relatively] parallel to top of body)-horizontal (parallel to front of body) |
Major Conceptual Reverses / Opposites / Categories:
Protecting Fans |
▪Refer to Protecting Fans / Bowing to Buddha |
Isolation Sequence #1 |
▪Refer to Isolation Sequence #1 / Bowing to Buddha |
Darting Leaves |
▪Refer to Darting Leaves / Bowing to Buddha |
Unfurling Crane |
▪Refer to Unfurling Crane / Bowing to Buddha |
Destructive Kneel |
▪Refer to Destructive Kneel / Bowing to Buddha |
Flashing Wings |
▪Refer to Flashing Wings / Bowing to Buddha |
Gathering Clouds |
▪Refer to Gathering Clouds / Bowing to Buddha |
Circles of Protection |
▪Refer to Circles of Protection / Bowing to Buddha |
Dance of Darkness |
▪Refer to Dance of Darkness / Bowing to Buddha |
Thundering Hammers |
▪Refer to Thundering Hammers / Bowing to Buddha |
Unwinding Pendulum |
▪Refer to Unwinding Pendulum / Bowing to Buddha |
Reversing Circles |
▪Refer to Reversing Circles / Bowing to Buddha |
Snaking Talon |
▪Refer to Snaking Talon / Bowing to Buddha |
Circling Fans |
▪Refer to Circling Fans / Bowing to Buddha |
Isolation Sequence #2 |
▪Refer to Isolation Sequence #2 / Bowing to Buddha |
Defensive Cross |
▪Refer to Defensive Cross / Bowing to Buddha |
Bowing to Buddha |
▪Zone of Action (defense): inside the leg (left / right) / between the arms |
Prance of the Tiger |
▪Focal Points: singular / multiple |
Shield and Mace |
▪Zone of Action (defense) (primary): inside the leg (right / left) / outside the arm (left / right) |
Five Swords |
▪Zone of Action (defense) (primary): inside the leg (right / left) / inside the leg (right / left) - inside the arm (right / left) |
Twirling Hammers |
▪Zone of Action (defense) (primary): inside the leg (right / left) / outside the arm (left / right) |